Monday, May 31, 2010

Bush Beans

It's 'bean' crazy keeping up with the bean harvest this past week. I put in 54 bush bean plants in one of the raised beds this year (9 plants per square). In the past years I put in maybe 8 and would only get enough beans for a couple of dinners. I really wanted to be able to freeze some beans this year. It looks like I will be busy cooking and freezing this week.


How to freeze Green Beans...

1)Trim off ends of beans and rinse
2) Bring large pot of water to boil
3) Prepare a large bowl of ice water with enough room to throw beans in
4) Toss beans  into boiling water and let them blanch for 3-7 minutes (the beans should be bright green)
5) Quickly Strain the beans and then put them into the bowl with ice water. Cool them for the same length of time that you blanched them. The cold water stops them from cooking.
6) Strain the beans
7) But beans into freezer Ziploc bags and use a straw to suck out any extra air or use a vacuum sealer.


The beans should last up to 7 months in the freezer...so make sure to date them!

On a side note: You can do this with beans from your local farmers market. Just make sure they were harvested within 48 hours of going to the market. If beans aren't fresh, they become rubbery.

Sunday, May 30, 2010

Cucumber Harp

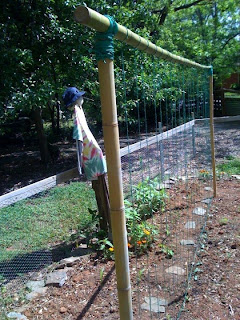
Growing vertically in the garden not only helps you save space but it can also help you with pest control. Matt helped me put this 'cucumber harp' together at the beginning of the growing season. I think it turned out to be more of a functional art piece. We used three pieces of bamboo that my neighbor Bill harvested from a lot in our neighborhood. I weaved some regular garden yarn vertically with a spacing of about 6" apart. I also wove three horizontal rows 6" apart on the bottom. Guess how far apart the plants are spaced...6". The bottom horizontal rows are just to give the plants extra support when they are starting off.

We have two varieties of pickling cucumbers and 1 variety of regular heirloom cucumbers growing up the harp. One of the pickling cucumber varieties are heirloom seeds from Matt's Step-Grandmother June. They are white pickling cucumbers and June always shares her yummy pickles with the family. They are a huge hit and I can't wait to try and carry on the tradition. In the last week all of the plants have really took off...climbing and climbing.

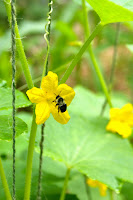
I'm happy to see the bees are plentiful in the garden now. I was worried that I hadn't seen that many. With all of the squash and cucumbers showing off their yellow blossoms, the bees are having a good time. I used to run when I saw a bee but now I feel like I have some little helpers in the garden. I really appreciate all of their hard work.

I have been freezing lots of our dill to get ready for pickling. It is an easy thing to do. I never  have been able to use all of our dill when it is fresh. You can trim dill sprigs so that they only have about 1" of stem. Rinse them and pat them dry. Place them into freezer bags. Make sure to push out all of the air. Lay them in the freezer flat and in a place where they will not be crushed. They freeze just beautifully.

Can't wait to eat fresh cucumbers and to start pickling!

Tuesday, May 25, 2010

What is this? A white carrot?

"What is this? Is it a white carrot? I didn't know we sold this."
This is usually what I hear from the super market clerk whenever I purchase daikon. A manager is called over to hunt down the strange root in the produce section. I get the same blank stare when I buy a watermelon radish.

I was excited to see daikon seeds in the heirloom seed catalog this year. I haven't ever really considered growing some of the less famous varieties but I couldn't wait to try. The seeds went in early March under the cover of our 'greenhouse'. They sprouted quickly, just like my regular radish varieties.

A little lesson learned: I planted them using the square foot garden measurements for regular radish, which is 16 per square. I wasn't considering the rather large size that daikon can grow to. Mine ended up being smaller as a result but it's okay. Sometimes, you have to learn these things as you go or grow. We have about 5 dozen that we are harvesting over the next few weeks.

Daikon can be used raw or cooked. I personally prefer it raw in salads. I don't eat raw onion and find that I like radish as a substitute. I have also read that you can use the greens just like turnip greens. We will have to give that a try.

Here is a recipe for Pickled Daikon and Carrots:
(Makes 6 servings)

Ingredients:
1/2 pound daikon 
1 carrot 
1 tablespoon canning salt
1 cup water
1/4 cup distilled white vinegar
1 tablespoon sugar
1 teaspoon red pepper flakes (optional)


Directions:
Wash, peel and shred daikon and carrots. Put vegetables in a bowl, sprinkle on the salt and mix well. Let stand for 30 minutes. 

Drain off water and squeeze vegetables as dry as possible. 

In a small bowl combine vinegar, sugar and pepper flakes. 

Place in a clean quart-size jar and refrigerate overnight or 6-8 hours

Friday, May 21, 2010

Presto Pesto

I made my second batch of pesto yesterday. We aren't really ready to eat it this week. I decided to freeze some for later. But first...here is how I make my pesto.

1) Stumble out to garden feeling groggy but determined.
2) Scout out the basil that is ready for harvest amongst the jungle.
3) Trim off what looks like 2-3 cups worth.
4) Stroll by the brussel sprouts to pick off any cabbage worms that are trying to feast.
5) Tear yourself away from any other garden task that seems to be calling you.
6) Go inside and rinse the basil thoroughly.
7) Remove all of the containers of leftovers from the top shelf of the fridge to locate your shredded parmesan cheese. Measure off 1/4cup (or more if you are cheesy) of parm and set aside.
8) Peal and mince 2-4 garlic cloves (depending on what you like). Try not to slice off your finger nail like this girl right here did.
9) Decide that pine nuts are over rated and pull out the walnuts instead. Chop up 1/4 cup and set aside.
10) Measure out 1/4 cup of extra virgin olive oil.
11) Cut and juice a lime for 1 tbls of juice.
12) Rummage through the cabinets for all of the parts to your food processor.
13) Throw in Basil and pulse, then add some garlic, then some walnuts, pulse some more, then more garlic, pulse, then some walnuts....
14) add parm and olive oil
15) Continue to pulse till smooth consistency.
16) Suddenly remember the lime juice and throw that in. Pulse a few more times.
17) Taste and decide it needs a little nutmeg and dash some in...pulseeeee
18) Scrap all of the pesto into a Ziploc bag and snip off a corner.
19) Pull out a ice tray from the freezer. Crack it and dump the ice in the ice bin. Rinse it out for good measure.
20) Squeeze out pesto into cubicles and laugh out loud as Office Space lines run through your head.
21) Place tray in freezer.
22) Smile because you have a dishwasher or not.
23) Let them freeze up and then move them over to a freezer bag and use cubes as needed.


Tadaaaaaaa!

Thursday, May 20, 2010

Give Me Some Sugar!

MMMMMMMMMM.... Sugar Snap Peas. Does anybody not like sugar snap peas? And if so, are your taste buds fried off?

I planted sugar snaps in three intervals starting back in March. They had the cover of a make shift greenhouse to help them get started. Once a week for three weeks I would press more seeds into the ground. They only need about 1.5"-2" of spacing. I guess they like the company?

Like most peas, sugar snaps are a cool weather crop. You can plant them as early as 2-4 weeks before the last frost. If you missed getting them in this Spring, do not fret! You get a second chance in the Fall. Plant seeds alternatively 6-8 weeks before the first Fall frost date. They like a lot of nitrogen in the soil. I used some of our grass clippings and mixed that directly into the soil.

The snaps took off fast and they nearly tore down the trellis I built for them. I had to add an 'extension' to the trellis a couple of weeks ago because they were reaching for the sky and falling over from the weight of the peas. Apparently they can grow to 6' tall. I somehow missed that tidbit of information.

The snap peas have slowly been disappearing. I can't help but pull them straight off of the vine every time I come into the garden to work. I handed one to Matt last week and he commented that it reminded him of his childhood. His folks had a garden when he was a kid and I could tell by the smile on his face it is a very positive memory.

I can't wait to cook these up with a little butter! Or, boil them up and saute them with mushrooms and olive oil. Yummy! That is ...if they make it to the pan :)

Sunday, May 16, 2010

Volunteers


Composting kitchen scraps and yard waste greatly reduces your amount of trash and can really pay off in the garden. We use a large barrel tumbler for our kitchen composting. It keeps animals out and cooks pretty quickly. It still doesn't produce enough compost to add to all of the garden beds on our nearly 1/2 acre lot. This year, Matt brought in some compost from the city. It was really inexpensive and beautifully rich.

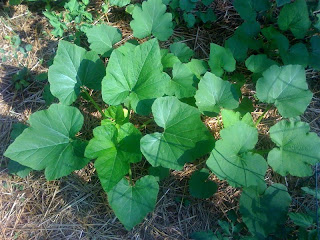
We started to run out of the compost we brought in right as I was turning over the ground bed in our veggie garden. I remembered our barrel compost and we spread it through the center of the ground bed. After only a few days, I noticed little volunteer seedlings popping up right where we spread our own home compost. I decided to let that area stay "Volunteer". I knew that all of the produce we use in our own kitchen is organic. I felt confident about letting these selfless plants grow and prosper.

The volunteers are really the strongest and largest plants in our garden. I am thinking that their ability to survive the compost bin makes them super seeds! I will try and harvest seeds from some of these plants for next year.

I am not sure which plants are squash or zucchini...it will be a surprise. I also found a little watermelon volunteer emerging and numerous cherry tomato plants.

Yay for volunteers!

Thursday, May 13, 2010

Drop It Like It's Hot


I may have been over zealous in the pepper department this year. I think that I often forget we are a family of 2. We have 6 Jalapeno plants, 1 Garden Salsa Pepper plant, 6 Banana Pepper plants, 3 Red Chili Pepper, 3 Red Bells, 3 Yellow Bells, and 3 Green Bells. They are all blooming and the little peppers are beginning to fruit!

I have to say that peppers are another very easy plant to grow. They are virtually indestructible. They crave warm weather and a long growing season. I think we have that pretty covered here in the South. I have read about pepper caterpillars and grubs but I have never seen one. Of course, now that I wrote that...the pests are probably swarming in. I had a little pepper 'happy accident'. I found out that Basil and Peppers are good companion plants. They really seem to be taking off together.

I'm going to be looking for ways to use all of these different varieties. Salsas are a no brainer. I'm thinking of some funky pepper pickling. Say that three times real fast. Funky Pepper Pickling...
Share with me your favorite pepper recipes!

Wednesday, May 12, 2010

Sweet Potatoes

Last year Matt's Aunt Pam gave me some sweet potato slips. I never knew growing anything could be so easy. I literally planted them in the ground and forgot about them for over 3 months. I was so delighted when I began harvesting them. They were gorgeous! A few weeks later we were enjoying the best sweets I have ever had!

This year I decided to make my own sweet slips. I did a little research and it all seems pretty easy!

I started with two certified organic sweet potatoes that I had saved from my produce delivery. I used two old mason jars and filled them half way with water. I stuck the sweets with four tooth picks so that they could be propped on top of the mason rim and partly submerged. About 10 weeks later I had some real strong slips growing off the potatoes.

I then snapped the slips off when they were about 6" tall. I left the potatoes in the water because there are more slips still growing. I placed the removed slips into a reused salsa jar with some water where they could grow roots for a few days.

Today I planted the first 6 slips into a new potato bed. I planted about 2/3 of each slip under ground and left 1/3 above. As the vine grows, I will continue to cover the slips.

Eventually I will add a trellis to just let the vine run off. In about 3 months....sweet potato goodness will be all mine! Bwahahahahha!


Slugs

My buddy Eunice asked me today about Slugs in her garden. I thought I might share what I have learned about these slippery pests.

I have to confess that Chris B. and I performed a small 'slugacide' one night on my side porch. This involved beer and kosher salt. Beer attracts slugs. I think we proved that it doesn't matter if you put the beer in small containers on the ground or drink one yourself :) The slugs will still come out in force. Chris and I surrounded the porch with Kosher salt and watched the little slugs wither up. It sounds disturbing. It was. But, we did learn that the old slug and salt tale is true.

I did place small containers of beer around my strawberry plants when I used to have them in the ground. I have since resorted to growing strawberries in pots. It is much easier to control pests when you plant the strawberries in pots. The beer does work though. The slugs crawl into the dish and essentially drown. Please say a little prayer for the slugs.

Slugs LOVE moisture. Another tip is to water in the morning. This way, most of the moisture burns off during the day. Slugs also love to hide under things such as pots, boards...anything flat. So, try flipping their hide outs during the day and dowsing them with salt.

There are chemical options but I don't use them :)

Why Blog?

When I was a little girl, my parents would haul us down to Florida a couple of times a year to visit our grandparents. I think my siblings were not really into the idea of the long drive. I had something special waiting for me. Every time we visited my grandfather would walk me around his garden for a private tour. He knew every name(common and Latin) for his hundreds of rose varieties. It was amazing to me. I listened with great interest and watched his face light up as he told me the special qualities of each flower.

Grandpa would also take me to the local nursery with him. He was the "Norm" of the nursery. People would collect around him as he walked through the aisles with little me in tow. I still feel his presence when I walk through flower nurseries and in my own garden. It's so comforting. Grandpa would also cut and create bouquets of flowers to take to nursing homes and friends. Somehow I knew at that young age what a gift this act was. The gift of giving something away that he nurtured and loved.

In my own garden, I only have one rose bush. I don't even touch it. It is amazingly beautiful and thrives. I'm pretty sure I know who tends to those blossoms. It is currently in full bloom.

I now understand what my Grandpa found in his garden. A sense of peace. Watching the soil break open to give life from a seed. It is such a gift. I find such satisfaction in harvesting vegetables and flowers to enjoy in our home and to share with friends. Everything comes full circle.

There is so much that I learn on a daily basis from being in the garden. The lessons are both practical and spiritual.
That is why I want to share my garden with you.
Grow in Peace...